
As outlined here, Podman is a like-for-like replacement for Docker, the classic container software, but it runs containers as an ordinary (non-root) user. This reduces the opportunities of hackers if they manage to break out of the restrictions of the container.
Containers allow you to run multiple loads on a single server in separated workspaces. Its very useful if the software has to be run in many environments. A running container is created from an image that includes all the files and configuration to get the software operational. There would be no need to step through manual installs and configuration scripts. That sounds a bit like a package manager but with containers the process runs in its own separated environment and is not intermingled with other code and resources. You have control of the system resources that the software can see and interact with.
Lets have a look at obtaining Podman container images, building our own and then running the resulting images as containers, but first we need to install Podman.
Install Podman
Installation on a number of platforms is described here:
https://podman.io/getting-started/installation
We’ve installed it on a Ubuntu host (instructions here)
Podman Images
A container image contains all the files needed to get a container up and running. To do so it will need the help of a ‘container runtime’ and the host systems operating system kernel but the image will include all the required operating system utilities and any desired user software.
You could say there are two types of images: base images & user images. Base images include just operating system utility software and don’t do very much on their own. User images take a base image and add in the software that does useful work.
You would normally obtain base images from a remote “registry”. These can be thought of as a web site that holds container images. Podman doesn’t have its own registry / image library but it can use what is probably the main container image registry on the web: the Docker Hub.
podman pull docker.io/library/ubuntu
podman image list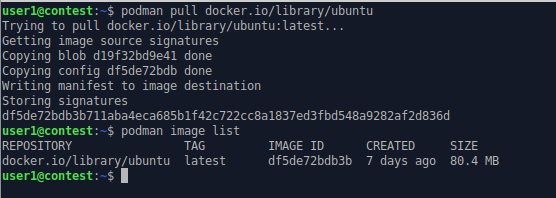
This downloads the latest Ubuntu image from the Docker hub onto the host’s filesystem. The “latest” tag is added by default if a version tag is not explicitly specified.
Containers
A container is an image running within a container runtime. This is overseen by Podman which uses the “runc” container runtime.
podman run ubuntu
podman conatiner list –all
Here Podman took the Ubuntu:latest base image and started a container which had nothing specific to do so it exited.
Lets try that again but this time run a shell within the container to give it something to do and allow us to interact with it. If you start a container and want to interact with it on the command line you should use the “-it” options.
podman run -it ubuntu /bin/bashWe can then issue the following shell commands within the container
@inContainer/# ps -ef
@inContainer/# ls
@inContainer/# ip addr
@inContainer/# ss -lt
@inContainer/# exit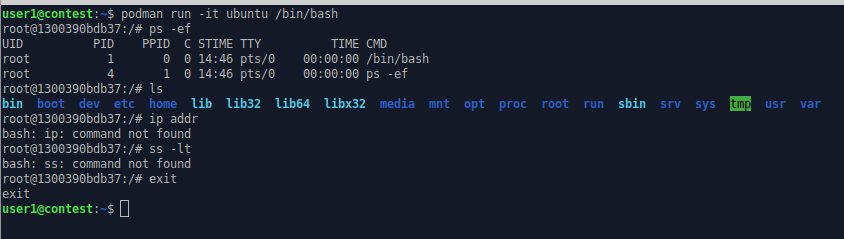
This lists just two processes running within the container: the ‘/bin/bash’ shell and the ‘ps’ command itself. The ls command shows the container has its own Unix-like file system however basic commands like ip and ss are not available. Many utilities are not included in the base image to reduce image size.
As mentioned above, base images on their own are not too useful. Lets add some user build software to create a user image.
User Built Images
Lets use a simple Unix shell script to output the current time.
#!/bin/bash
echo "The time inside the container is" `date`;
and place this in a directory ~/app1 (where ~ is the user’s home directory) on the host. As with all shell scripts we have to make sure its executable (chmod 777 time.sh).
Now we borrow the concept of a Dockerfile from Docker build tools (for PodMan it is named “Containerfile”). A Dockerfile/Containerfile takes a base image and applies a series of updates, such as adding files and installing software, to create a new image. It is essentially a script to build a user image from a base image. You can use Dockerfiles to create images within Podman (Podman uses the “buildah” utility behind the scenes which can deal with Dockerfiles).
We create a file named “Containerfile” in the ~/app1 directory and populate it with
FROM docker.io/library/ubuntu:latest
ADD time.sh /usr/local/bin/time.sh
CMD ["/usr/local/bin/time.sh"]
This defines the base image as the ubuntu:latest image we retrieved above. It adds the shell script to show the time to the user image and then, when the image is run as a container, the CMD is run to invoke the script.
We can then run the build to take the Containerfile and create the new user image.
podman build -t user_image ~/app1
podman image list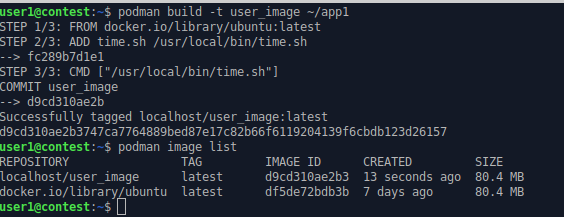
Now we can run the container.

The user_image contains everything necessary to run the application. The only other thing it needs is a container runtime. To let other people run your application all you need to do is upload it to a image registry/library (perhaps Docker Hub, a container repository of a cloud provider or some other suitable repository) or you could save it to a tar file (using the ‘podman image save’ command) and move the file manually to the target environment.
Both Podman and Docker use the OCI container format so images prepared for one can run directly on the other.
Web Server
The main practical use of containers in the cloud is to host long running “service” processes. Lets try setting up an Apache2 web server running on top of Ubuntu in a Podman container.
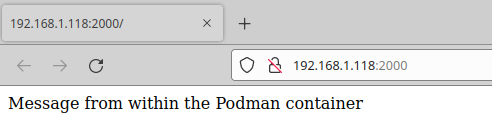
We’ve created an build directory, ~/app2, and created a simple index.html page file to be shown by the web server (for simplicity we’ve not bothered with html).
Message from within the Podman ContainerNow create the Containerfile in the same directory
FROM ubuntu:latest

RUN apt-get update && apt-get install -y --no-install-recommends apache2

ADD index.html /var/www/html/index.html

VOLUME ["/var/log/apache2"]

EXPOSE 80

CMD ["apachectl", "-k", "start", "-DFOREGROUND"]
The FROM directive starts with the same base Ubuntu image as we used above. The RUN command installs the apache2 web server from the standard repositories. The index.html file we just created is installed at the root of the apache2 page hierarchy (index.html being the default page name for web pages). We declare a filesystem volume “/var/log/apache2” and allow (expose) TCP networking port 80 from inside the container to be linked to the outside world. Finally the CMD runs the Apache web processes in foreground.
Let’s build the image
podman build -t web_srv_image ~/app2
podman image list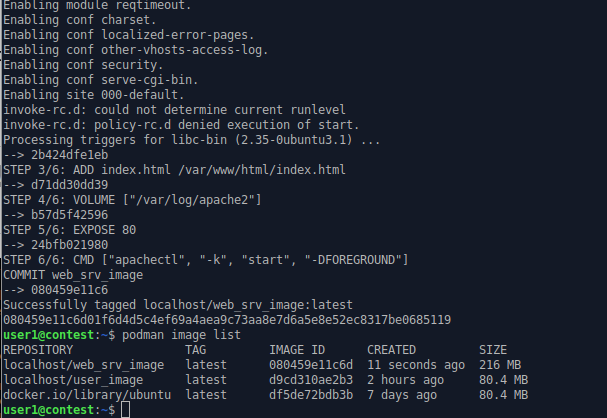
Note that the size of the image has grown considerably with the addition of the web server. Including Apache2 the image is now 216MB. There are a number of smaller base images that can be used which can significantly reduce the size of the user image (notably Alpine Linux) but many of these do not have commercial support or a clear security foundation so care should be taken when using them.
This time when we start the container we have to map the filesystem volume (-v) in the container to the host filesystem (so we can see the logfile from the host) and map the TCP port number inside the container to a TCP port on the host (-p). The -d option (detached) is used to indicate that the container should run in background. Without the -d option, the “docker run” command would appear to hang because the container is running in the current session.
Note that it is not possible to map to a TCP port below 1024 (without the –privileged flag) because, unlike Docker, Podman containers do not run as root (you could also sudo but that would negate the benefit of using Podman).
podman run -d -p 2000:80 -v /home/user1/weblog:/var/log/apache2 web_srv_image
podman container ls
We can now connect to TCP port 2000 on the host (the host IP is 192.168.1.118 in this case) and see what is being served.
We can also check out the mapped file directories. Remember “/var/log/apache2” was made available in the Dockerfile above and we mapped it to /home/user1/weblog when we started the container.
ls ~/weblog
tail ~/weblog/access.log
The host can thus monitor what is going on within the container – but only if the image declare a volume as being available.
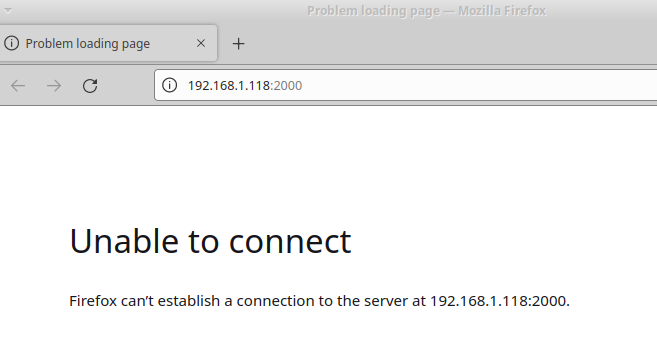
We can stop the container.
docker container stop <containerID>
docker container ls
The container is down and the web page is no longer available.
The container’s file system is still available on the host so it could be started once more. If you are not going to restart it then it would just take up space. You can remove it to purge the files from the host file system.
podman container remove <containerID>If you know you are not going to restart the container, you can start up the container using the “podman run –rm” option which will automatically remove the container when it is stopped.
Summary
That was a quick introduction to Podman, a alternative to Docker that runs container as a non-root user. You use Podman to run several, separated loads on a single host computer. You take a base “image” from a central repository, customise it using the likes of a Dockerfile/Containerfile and then get Podman to build a new image to your requirements. You can them run that image inside a container on the local computer or move it to other computers and then run it with a single command.
You can view the key differences between Docker and Podman here.