
Here’s a quick introduction to digital certificates using the ubiquitous OpenSSL tool.
Securing communications uses two approaches:
- symmetric cryptography – where sender and receiver both know and use the same key
- asymmetric cryptography– where sender and receiver use different keys
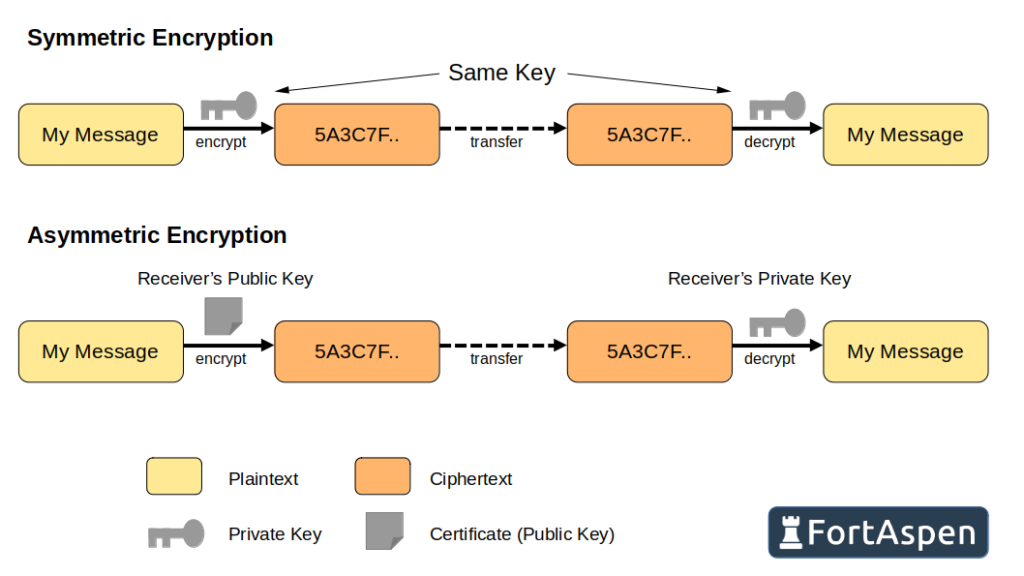
The practical limitation of symmetric cryptography is the distribution of keys. Its not possible for two parties that haven’t previously shared a secret key to communicate securely. This is where asymmetric cryptography comes in. Each party has (A) a private key that only they know and (B) openly publishes a linked public key. To send a message securely you can encrypt it with the receiver’s public key and then only they can decrypt it using their private key.
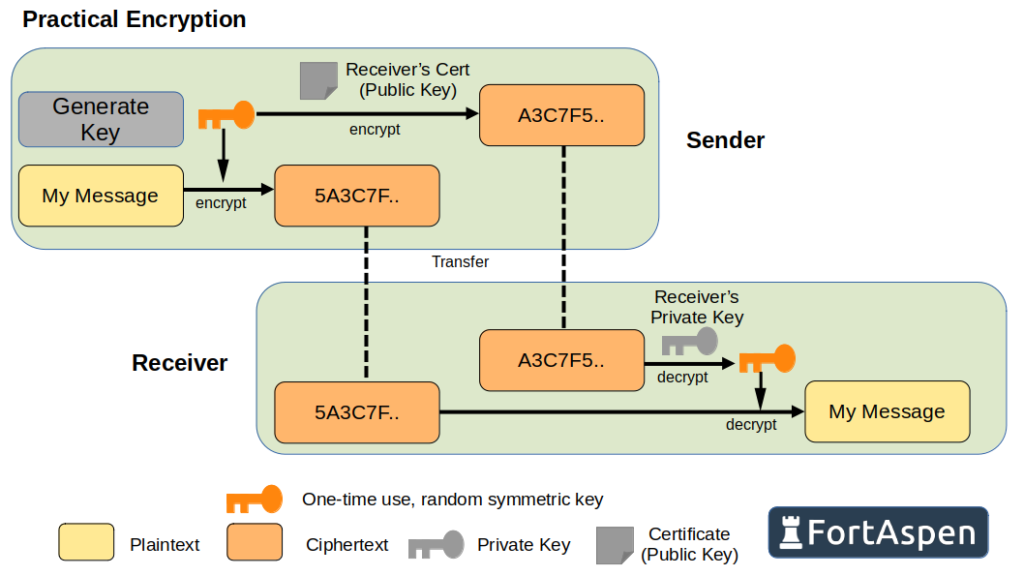
It does however take much less processing power to send a message securely with symmetric cryptography than asymmetric cryptography so practically messages are sent using a symmetric algorithm using a randomly generated one-time key which is encrypted using an asymmetric algorithm. The encrypted message (symmetric) and encrypted key (asymmetric) are sent together. To get at the original message you need to
- decrypt the key (asymmetric algorithm) then
- decrypt the message, using the symmetric algorithm and the recovered key.
The most commonly used asymmetric cryptographic protocol is “RSA”, first published in 1977 by researchers at MIT called Rivest, Shamir & Adleman. (An alternative asymmetric approach is elliptic curve cryptography (ECC) which is often used on lower power devices.)
To work with RSA you need a private key and a public key.
Private Key
The private key is essentially a large number. Unsurprisingly, given it is private, it MUST BE KEPT SECRET. OpenSSL can generate a private key for you.
openssl genrsa -out myVeryShortKey.key 512This will create a file in “PEM” (Privacy Enhanced Mail) format that looks like
-----BEGIN PRIVATE KEY-----
MIIBVgIBADANBgkqhkiG9w0BAQEFAASCAUAwggE8AgEAAkEAtcl1/53XnSMQQxUy
V0l1z96mCNkGx3E+MhlS0gkyBohdL8DHOuJmNgs0AtLw7GsyiPWtiMoVgQzKFLS/
KJ5ClQIDAQABAkAtrdXsyWjon2rysFzZ+ieUeEoYZxCBBT+vrxVUmeLsKONX4Fb4
C3X2nlscbgLjH6J4I6Y1eI/++a3D+StcjxIBAiEA4jimrasNlT8wNYZZ7fwJJzDj
qdRpzFfqKHOiveHUfvUCIQDNt27u1l6EM0plWlFZue9rauDa1Yms9/xwyo/O0hkx
IQIhAOAso3+V8m/jnjJsYNGk4K0llXXGONF2jWRosuzXzWvBAiEAqxzmcFHtwocr
XczXmAvaQ35eVIiEgVSxLVzAa+dEvyECIQCqDoaqsd+qhfi3R1vwo4L+9rKEQzSf
3qo9Bj7t9X/aNA==
-----END PRIVATE KEY-----
You can ask OpenSSL to check that a file contains a valid RSA key like this.
openssl rsa -in myVeryShortKey.key -check -noout
The ‘512’ in the above command is the desired number of bits in the key. The more bits in the key the more secure it is. Today 512 bits is wholly inadequate for RSA keys (but it creates a smaller file for demo purposes!). Since 2015 the US government NIST has recommended a key size of at least 2048-bit. A 4096-bit RSA key is the norm.
Don’t confuse the RSA (asymmetric) key length with the key length of a symmetric algorithm (e.g. AES). A 256-bit key used by AES is very secure but it is a very different beast and used in a very different manner to an RSA key.
Given private keys should be kept secret, its possible to secure the private key file with a password.
openssl genrsa -aes256 -passout pass:oops -out myVeryShortKey.key 512This creates a key file that looks like this (Note the “ENCRYPTED PRIVATE KEY” header and footer).
-----BEGIN ENCRYPTED PRIVATE KEY-----
MIIBvTBXBgkqhkiG9w0BBQ0wSjApBgkqhkiG9w0BBQwwHAQIHDROIIWBqbYCAggA
MAwGCCqGSIb3DQIJBQAwHQYJYIZIAWUDBAECBBBBY5ay3OVSUNiqOd15ulnpBIIB
YETIbaPtpSwSunr1MX5vqlJKabNEQnBCwH3zj3awhLhVuC1RIVW1U94zvZDbAzlx
0MQePbMuSXHTFM2Zc8Bgy5pTYYxnPs0f312V+elcS+aYVFGdVXMrdVbrHZAENFr3
oe0N7LSA7fYBPKa6VIdlYL7JZ1YZTVCebekbGDeI8c4FvHsnd9lQgUBR5fR2sUeM
gtHNc8OM8t9/7rFUJxC9MRlXSJGPMCs9PCNWpN2DKhY8caR1HtdrhsNYRCteeGdW
JaKfHV3dAEGXuAEgeBmyYe43FxRdYcWCzC3zsPyM1mknWtAFzJhQz9CHcpCKKjEO
jd1ilI9iOUOXv+wpQJjCmkkrWyXVPLBESqeSme3DVPGuLiTjudg0e7bUlCURvL8K
WlQ0i1+kkjJ9lVGP3Vl6PH2P0mdFfhUBiEFgkN/xWLdEoCGuOVANSi5m6eycsfnQ
MK/EJOwb15bZkbEbNF9ixHs=
-----END ENCRYPTED PRIVATE KEY-----
The password will have to be entered every time the private key is used. Its not great that the password is in the openssl command line entered. This means the user’s shell history includes the password so the shell history has to be cleared regularly.
It should also be noted that if you are using this private key to secure a web server then you would have to enter the password every time the process starts up which may not be practical.
Public Key
The public key normally takes the form of a “certificate”. The standard format is X.509. The public key is created to work with a specific private key so when a public key certificate is created by openssl you have to point to the private key. It will also be necessary to say how long the certificate should be valid (here 365 days).
openssl req -x509 -new -noenc -sha512 -days 365 -key thePrivate.key -out thePublicCert.crtYou also have to specify the “subject” of the certificate. That is the person, system or thing the certificate relates to. If you don’t specify a subject on the command line you will be presented with a series of questions. The entry in square brackets will be defaulted if you don’t supply values – so you have to enter values if don’t want to appear to be “Internet Widgits Pty Ltd, Some-State, Australia”.
Country Name (2 letter code) [AU]:
State or Province Name (full name) [Some-State]:
Locality Name (eg, city) []:
Organization Name (eg, company) [Internet Widgits Pty Ltd]:
Organizational Unit Name (eg, section) []:
Common Name (e.g. server FQDN or YOUR name) []:
Email Address []:
Specifying the subject in the command line would look something like this
openssl req -x509 -new -noenc -sha512 -days 365 -key thePrivate.key -out thePublicCert.crt -subj "/C=US/ST=California/O=TheOrganisation/CN=theserver.mydomain.net"Where
- C – Country
- ST – State
- L – Location
- O – Organisation
- OU – Organisation Unit
- CN – Common Name
Together these are sometimes called the distinguished name (DN) (though the term is unhelpfully also used for something else in LDAP terminology).
The public key certificate, also in PEM format, looks like this
-----BEGIN CERTIFICATE-----
MIIE4TCCAsmgAwIBAgIUCK6GidOWdY23RiwBqYhnVUFVHhswDQYJKoZIhvcNAQEN
BQAwADAeFw0yMjA5MDkxOTIxNDdaFw0yMzA5MDkxOTIxNDdaMAAwggIiMA0GCSqG
SIb3DQEBAQUAA4ICDwAwggIKAoICAQDauWOT79F6xEgGQT633G8M1ypshbzvJRwk
d7bCjs3yxAb+BWqpclShMoRfyP+b8l+6dkORH1eGy+R8Cf0aqImy/6QU+12T1TDD
...truncated...
y3rsqesy8goQGjjQQAm9zIpGuan1XmaJMBaTB4XJFJraeFkfIlja/4otd8miNnVI
dCf4Hygh35Iy9FryCF3knqva6Vy63ZrTFv4xGVT+NrYDj/j8wAALL/qOjiWYga7O
jkWnjaM6Egkxx32Ku2lKFm4SVaQEJKrIGl5N9ooJtKeTxDGugabwQSIga40Zu+lm
D/2U3somZGzSqsVWh/Iov0DZXhulckHGHMj5jrIitmRHjh6TY6dfg7Xb2kPjad50
XZDr4yY=
-----END CERTIFICATE-----
You can inspect the contents of a X.509 certificate using the following command.
openssl x509 -in thePublicCert.crt -text -noout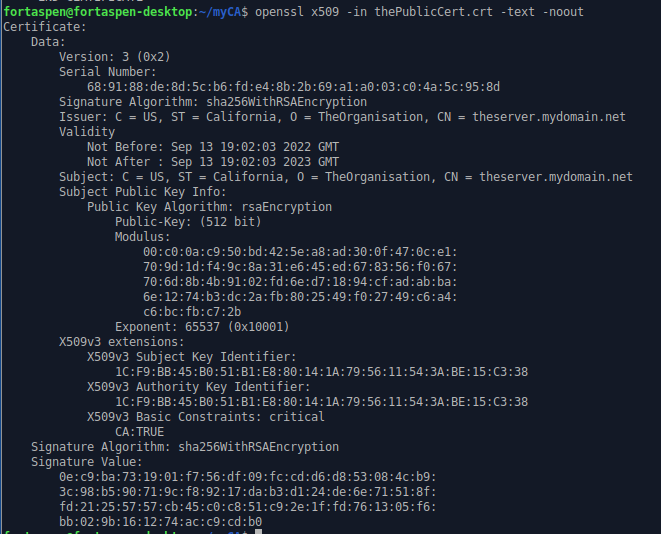
Now you have a private key and a public key. But how does someone receiving your public key know its is yours and hasn’t been replaced or tampered with? For that you need certificate authorities and certificate chains.